Christine's Introduction
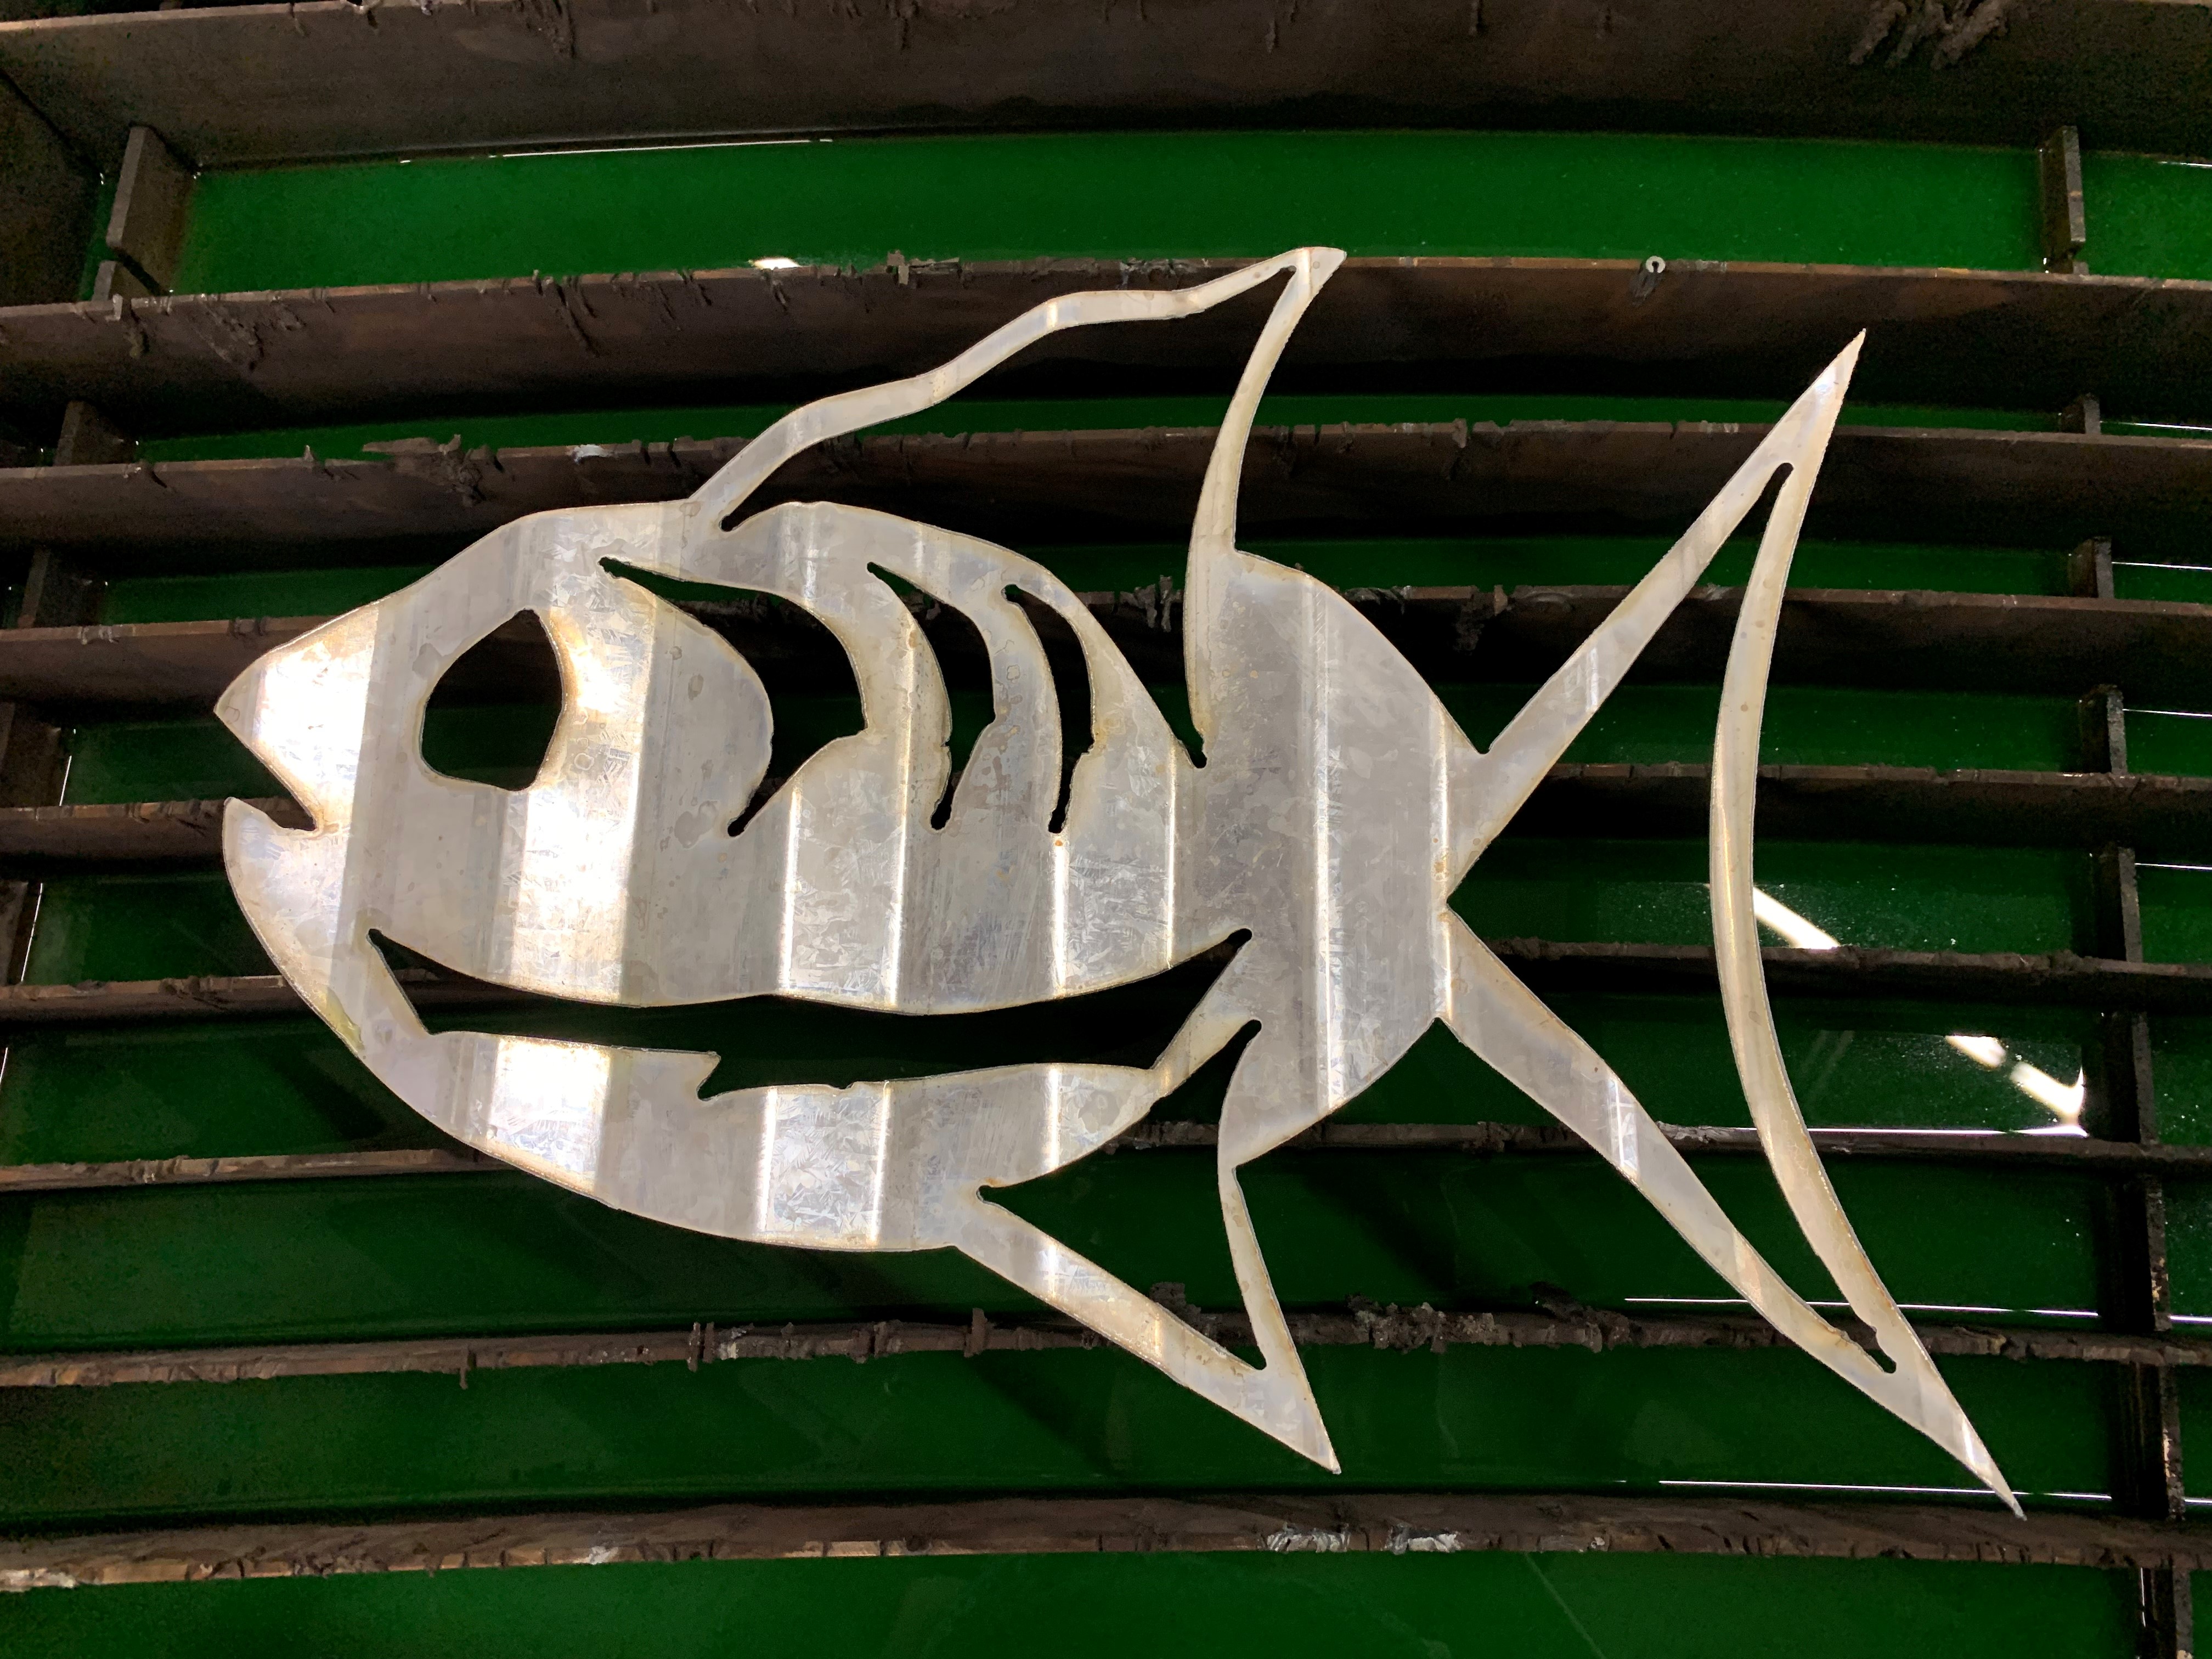
I believe this was my first ever attempt at steel art on Inkscape. I wanted to make a fish sign for my beloved would-rather-go-fishing-than-do-anything-else brother. This design was an exercise in adding and deleting nodes in order to add contours to shapes. The style I was going for was an angry fish; a fish with a personality worthy enough to be displayed.

Cutting Thin Material
Cutting any material requires striking a balance between speed and voltage. If the machine moves too slowly, the kerf will expand underneath the torch causing the plasma voltage to rise. If we cut too quickly, the material doesn't fully separate. When cutting 26 ga, or any thin material, the minimum amount of power the plasma power supply can provide tends to increase the kerf width (cut size). If we don't compensate for this larger kerf area, the head will lower closer to the workpiece trying to reach the target voltage setting. The cut settings for materials in the MADGUI or operators manuals are just recommendations. We may need to vary from them to get the best cut for our application, and we've seen the need to increase the voltage for the given feed rate in thinner materials.
How To Cut Corrugated Galvanized Steel
In addition to being thin material, this galvanized steel is corrugated. Luckily cutting corrugated steel is not sink or swim (hehe), and it's actually fairly easy. Let the MAD Plasma CNC table do most of the work for you! There is no need to change the x and y offsets. No need to adjust your artwork or part. We have figured out some guidelines to help you get a beautiful cut.
Step 1 - Sheetcam Changes
On the cam end of things, we actually do less work than in a flat project!
We have to give the ATHC (Automatic Torch Height Control) full authority to cut the varying topology of the corrugated material. Path rules in Sheetcam typically have one purpose: turn off ATHC because of a slow down. This doesn't work in this application since any horizontal movement without adjustment in Z height would cause the torch to hit the material being cut! We do this by simply not applying the path rule file for this type of project. The ATHC is then left active for the duration of the program, free to track the material height changes as necessary.
Step 2 - Cut Setting Changes
The actual cut settings could vary considerably depending on the valley depth and ramp angle of the specific material being processed. For testing, use parts that are large enough to cross adjacent corrugations, but not so big that you are wasting lots of raw material. We suggest a circle or rectangle. The settings you find with this test piece will get you very close to the final settings for your actual parts. Usually, close enough that the first real part you cut will be a good part.
Corrugated Might Require Speed Adjustments
Thin material typically has very high cut feeds. The feed we settle on to cut our corrugated must be less than the speed the Z-Axis can move (300 in/min) to guarantee climbing the ramp. For this project, we had to slow down from the recommended cut feed to give the head enough time to climb the steep corrugations. Don't forget to select Corrugated in the material profile to allow the ATHC to have full authority moving the Z-Axis
Why do we need to raise cut height?
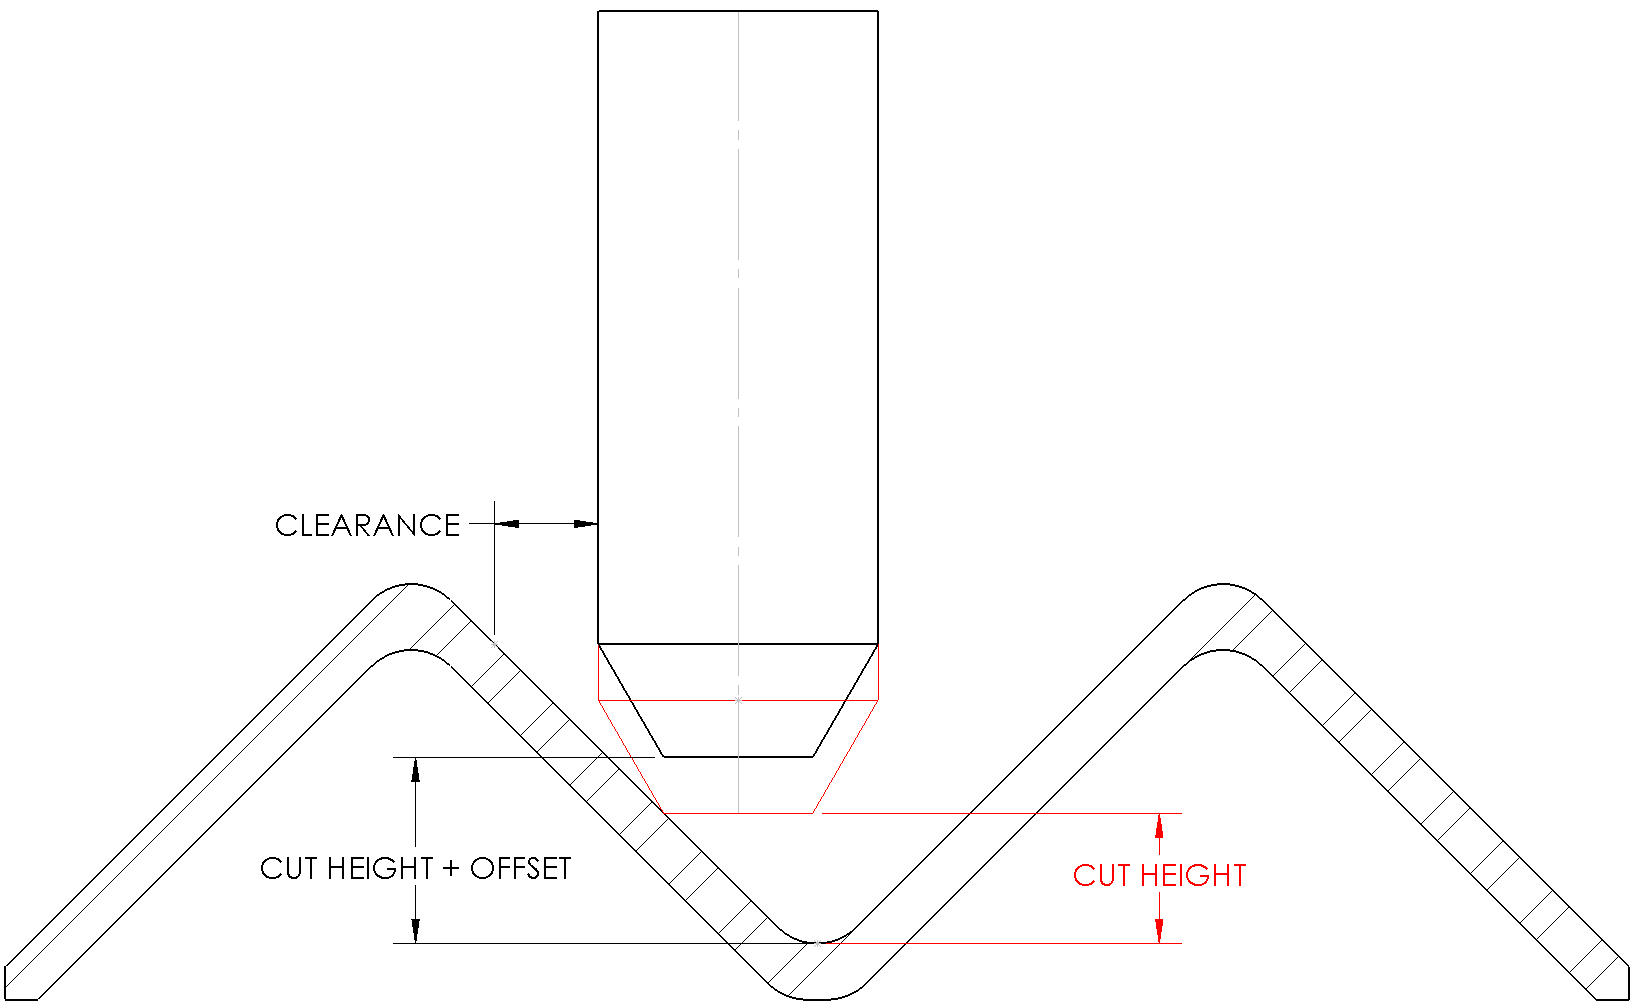
The plasma nozzle can be viewed from the side as a cone. Since the plasma stream is in the center of this cone, we have to have enough clearance between the wall (in this case the corrugated ramp) and the outside diameter of the torch body to avoid a collision. We can't adjust the X or Y position since that would change the shape and size of our final part. This leaves one option for a 3-axis machine: the Z-Axis. By shifting the cut height up we provide enough clearance for the torch body when climbing or falling with the topology. This same extra height offset is required for the pierce height and the cut height.

How did we find the final settings?
Now, we choose Consumables and Cut Settings in MADGUI like normal. Then, customization is required for this new material type. The Cut Height, Cut Voltage, and Pierce Height should be increased. In the case of our Angry Fish, we had Finecut consumables loaded with 26 ga material and chose Cut Quality 5 then increased the Cut Height from the standard 0.06” to 0.100”. That height affects the segments that don't have ATHC active. For ATHC sections, we bump up the cut voltage. For the increase in height, we started with a 25V increase in cutting voltage. Don't worry if you miss, just raise or lower this value as you cut small sample parts. Lastly, increase the Pierce Height at least 0.010" above the new cut height setting. We chose to move Pierce height from 0.09” to 0.120”.
Let's cut a test piece! Then check for the following:
Torch hits material immediately after pierce
Raise pierce height and cut height
Torch hits material changing directions at the bottom of ramp
Raise cut voltage / slow down feed rate
Torch doesn't track profile when going down the corrugated ramp
Slow down the cut feed. The Z-axis is not moving fast enough to keep up with the horizontal feed rate
Final Corrugated Settings for 26 ga Galvanized
- Plasma: Hypertherm Powermax 105
- Consumables: FineCut
- Voltage: 115V
- Cut Amperage: 30A
- Pierce Height: 0.120” (3.05 mm)
- Pierce Delay: 0.0 seconds
- Cut Height: 0.100” (2.54 mm)
- Cut Feed: 250 in/min (6350 mm/min)
Let's Cut a Fish
Now that I've shown you how to fish, it's time to catch one! Watch a video of the cut below!
Ta Da!

One angry fish ready to add to any fisherman's collection. Next time, I'll cut the elusive and colossal fish that got away!
Corrugated Material Tips to Remember
- ATHC must be kept active, no path rules and no slowing of feed rate slider
- Corrugated material setting selected for high speed ATHC control of Z-Axis
- Increased Pierce Height, Cut Height, and Cut Voltage required
- Cut Feed must be balanced keeping in mind that with standard consumables in thin materials the factory cut settings of more than 300 in/min feed will be too fast for the ATHC to keep up. Since the maximum feed rate for the Z-Axis is 300 in/min the required Cut Feed for thin corrugated material will most likely be in the range of 250in/min.
Thanks for reading about this project!
Hey! How do you communicate with a fish you haven't heard from in ages?
Drop them a line! If you are enjoying these blog posts, drop us a line at WomenThatFab@jd2.com. Or, check us out on Instagram #WTFJD2
Need some help with our products?
E-mail tech support at support@jd2.com.

